Wednesday, 2 December 2015

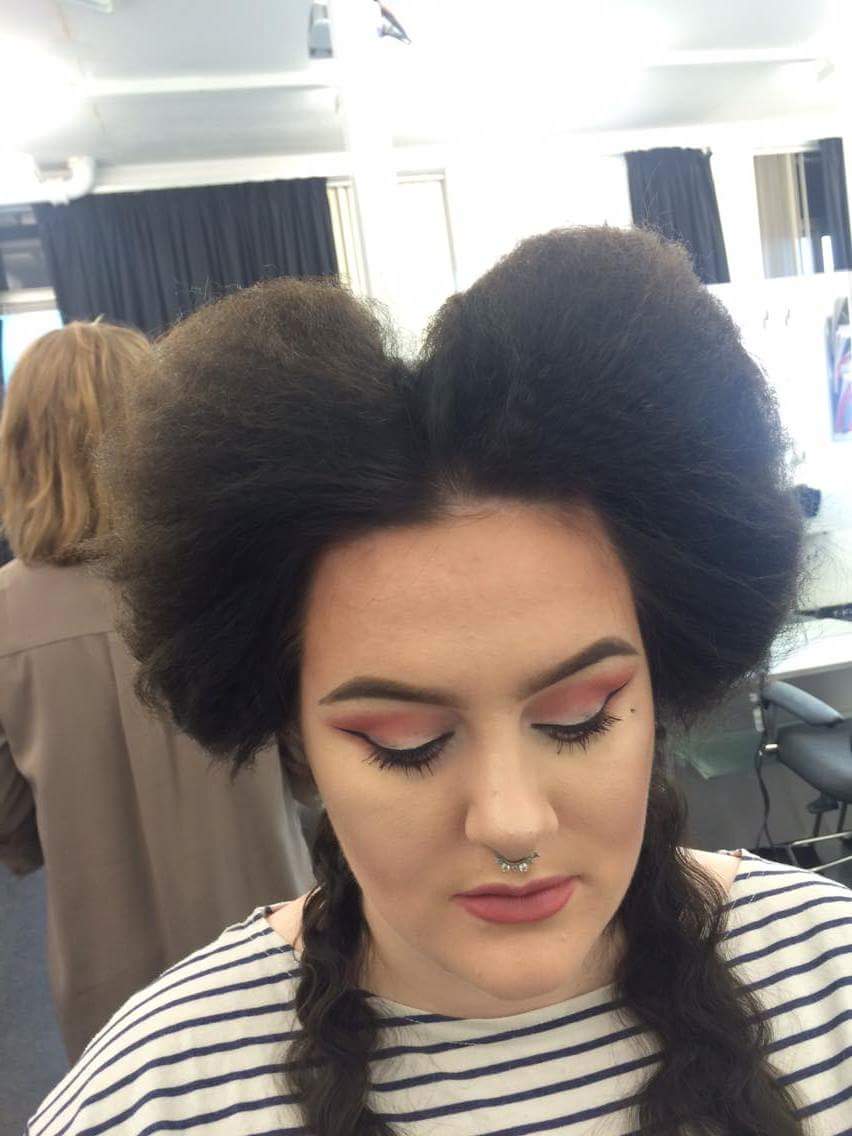
Chosen Design Practice on Me

It was Katherine's turn to practice my design on myself.
When showing her my hair chart, she seemed really keen about my idea.
There were a couple of things I had to mention to Katherine about my hair.
- Its naturally very curly
- The side is shaved (if she didn't notice already)
- There are 2 dreadlocks which makes brushing the rest of my hair an awkward task
- I have inherited a rough afro like texture to my hair from the African side of my family therefore frizzing for the assessment will not take much work!
I told Katherine not to panic and just go crazy because I wanted it a lot bigger and crazier than what I had created on Lil Nik.
Challenge accepted! I was really pleased with how well my partner did. Here is a quick video of the practice.


So as you might be able to see we tried to do the style like I had done of Lil Nik. Katherine rolled up the two sections and pinned them up. We then tried a more messier style where it wasn't rolled as tight.
Another bump in the road was the direction on which way the hair was going. When I had previously practiced on Lil Nik I had in mind for the hair to be rolled facing away from the face. In our practice sessions we came to the conclusion that it didn't sit right and that if we let the hair fall to the side it allows us to see the heart shape more.

In a lesson I was unable to make, Katherine managed to find a long piece of lace fabric that could be used instead on the chain detail I had originally intended to use. She suggested this to try out and I absolutely loved it! It gave a subtle Elizabethan feel to the hair and the way it was placed in the hair also outlined the off centre heart shape.

I am confident that Katherine will carry out my design well for the assessment. I feel we have had good communication and she understands the idea behind my design. I'm really looking forward to completing the assessment now!

Chosen Design Practice on Lil Nik

Lil Nik and myself had some quality time together while being bored at home one night. I decided to try out my chosen design on her!

As I had no crimpers, I couldnt crimp her hair but it wasnt a problem as I could still get a rough idea of what it would be like.

So I started off by sectioning off my shaved part of my hair. Lil Nik has a smaller head than me so its as close to scale as possible. 


I then sectioned where I would imagine my heart shape to be. It turns out to be slightly diagonal.


This would be the point where I would crimp the hair but in my practice I've moved on to the next step of brushibg the hair through and then working my way through and backcombing the two sections. I then rolled and pinned the hair loose enough so it would stay big but not too loose that it would fall out. This is the outcome.


I liked the shape but I didn't like the positioning. It just didnt look right to me and I couldn't figure out fully what it was! So I decided it was probably the positioning and I should try moving it over. So I almost flipped the look right over, brushed it all out, started again and sectioned the hair from the other side. I did the same process of backcombing the two sections, rolling and finally pinning them up. This was the outcome.


This was a lot better as you can see the heart shape more. I would imagine that once it is crimped and backcombed on longer, thicker hair it would be a lot bigger and the stylist would have more to work with.

I also tried rolling the top section in a slightly different direction to see what it would look like. Now I have done this I am not entirely sire which one I prefer but I will leave that to my test session with my partner.


The next step is to add decoration. I have a gold head band I wanted to put along the parting line. This is what it looked like.


As I didnt want to cut it up, I wasnt too sure about it because of it not being quite long enough for my own head and also that the elastic bit could still be seen. So I've decided to have a think about the decoration and what else I could use.
Now for my partner to practice my design!

Tuesday, 1 December 2015

Chosen Design Practice on Partner

Katherine gave me her final design to do on her hair. Honestly, I panicked a little bit. I looked at the yards and yards of ongoing hair she has and wanted to cry a little bit because I had no idea how I was going to do her design in the time given and also because I want her hair so badly.

She told me not to worry and I thought to myself just give it a go and see what happens! So here is the design she drew for me.


Ater working out where I would need to section the hair and what would need doing first, I actually felt a lot more at ease with the design. I timed myself so I could figure out how much I should speed up or what I could take my time at perfecting.

Step By Step

1. Section the hair horizontally just above the ear and clip the bottom half out the way.
2. Section off roughly a two inch band round the front and clip the rest of the hair out the way.
3. Part the band in the center.
4. Create a plait starting roughly at the top left and right of the forehead. The plait must be pulled at one strand to create a slightly different effect. Tie off with elastic.
5. Take back the top section of hair and section roughly 2-3 inches of hair in the center creating 3 new sections of hair. Clip the left and right sections out the way.
6. With the 2-3 inch rectangle, form a dutch plait.
7. Using suitably heated crimpers, crimp the top left and right sections.
8. Once cool, brush the hair through and work through backcombing it.

9. Take the left section and split horizontally into two. Roll the bottom section up and pin. Roll the top section down over the bottom roll and pin. Repeat with the right side.
10. Thread rope through the dutch plait in the center and incorporate it all the way through the plait.
11. Let loose the hair at the bottom section and brush it evenly over the shoulders.
12. Secure the material decoration around the neck and hair.

After the first practice I was actually very suprised at myself for completing the design in a reasonable time. I wasn't too happy about the way the two rolls were sitting as they sagged a bit due to there being so much hair! This is when we decided to try two rolls to make it more secure.
We also decided to change the plaits at the front. On Katherine's design, she originally wanted two plaits on either side however with all the baby hairs she has, it made it near enough impossible to do this. I suggested doing one plait either side instead and tested it out which actually looked better.

I also practiced on Lil Nik as I wanted to test out putting the decoration in the hair. As I had no thread or rope to hand, I grabbed the closest thing I had, my phone charging wire. I used my pin tail comb to wiggle the wire through.
 

Overall, I'm confident for the assessment now and I actually really enjoy doing this style. It's nice creating something different using simple techniques.

Rick Rack

Rick-racking is another technique that gives a similar effect to crimping. It gives a waved or zig-zag look to the hair and can be styled in to a look.

Method

1. Brush the hair through to untangle.
2. Section the hair with pin-taik comb where you would like to rick-rack. I sectioned roughly half an inch at the front.
3. Use a fine pin and place the middle at the root with the prongs facing away from scalp.
4. Weave the hair around the two prongs in a figure of 8 motion. Push the hair down every so often.
5. Secure the end by placing a grip over the hair and fine pin.


6. Use suitably heated straighteners and hold over the hair/fine pin for around 5 seconds.
7. Wait to cool and then unravel the hair.

8. At this point you can brush it through, leave it how itis or pull it apart with your fingers depending on the kind of look you are going for.
 

I found this technique really effective and I really liked the outcome. The downfall to this is that it takes a lot of time to create the rick-rack. I would love to use this design in my final piece however I feel like I would have to make it a simple design in order to do the rick-racking in time.

Creating Contemporary style on partner

How do you put all the techniques you've learnt in previous weeks together to create a contemporary style with elements of the Elizabethan era?

Well, I tried and this is what happened.
My beautiful model Annabel pulled off this subtle bridal look and here is how I did it.

Tools used:
-Paddle brush
-Pintail comb
-Sectioning clips
-Curlers
-Grips

Method:
1. Brush through the hair and get rid of any knots
2. Section it half way above the ear and clip the top part out the way.
3. Starting from the bottom spiral curl the hair and grip in place.
4. With the top section lift curl the hairl and grip in place.
 

5. Once cool, unravel the hair and pull apart with fingers.

6. Section about a 2 inch band by the forehead to the ears.
7. Part this band in the middle and then clip the two sections out the way.
8. Work from the forehead, section small parts with the pintail comb and backcomb by the roots. Only do the crown on the head.
9. Once complete, let hair flow down the back and lightly brush comb over the top to smooth it off. This should have created a small subtle bouffant.
10. Move back to the two sections at the front. Create french plaits and grip then at the back of the head.
11. Hair spray to finish and hold.


I was quite pleased with the look. The curling took up most of the time but overall it didnt actually take too long to complete. It was a bit tricky to curl Annabel's hair as it is slightly thin and tends to start dropping while it is gripped in place however the curl still looked really nice and natural. 


Creating Elizabethan Style

So this week we practiced a typical Elizabethan design on a partner.

It was strange working with Lil Nik for a couple weeks and then going to a real person.

I started off by sectioning off the front to create the heart shape. I crimped this part of the hair then brushed it through and backcombed it. It was then rolled up and positioned into the typical heart shape.

With the remaining hair I tied up in a ponytail. I sectioned off a small amount of hair at the bottom before putting into a ponytail.

At first I did a modern curl bun. I didnt think it looked very Elizabethan so I took it out and did a plait bun instead.
With the bit of hair at the bottom I used a 3 barrel tong that creates a wave in the hair. This made it look like the tendrils I have seen quite often in the Elizabethan period.

The style took roughly an hour to create which I am quite happy with. I managed to dive right into the task given and Im happy with my finished result. I found it strage to work with a moving person as Ive got so used to working with Lil Nik. I liked working with longer hair with a differet texture and colour. I still cant decide if I liked having my model trying to help me with the design. I suppose it has good and bad sides! Its good to see someone elses point of view and ideas. On the other hand, its my practice time and I should be adjusting the style until im happy.

Overall this week was really productive! I really enjoyed partnering up and being a model and an artist. It's been a good way of introducing myself on working on other peoples hair.

Crimping and Frizzing

Today, I got my hands on a pair of crimpers. I cant say I have ever had my hair crimped or been the one crimping someone elses hair but I was looking forward to try it though.

So what I needed for this was:
-Paddle brush
-Pintail comb
-Sectioning clips
-Crimpers!

I used the paddle brush first to brush all the hair through and get rid of any knots.
I then took sections of the hair no wider than the plates of the crimpers and around an inch or two thick using my pintail comb. Its best to start at the bottom of the head and work your way up.
Making sure the crimpers are heated to a suitable temperature for the hair, clamp the hair near the root and hold for 2-4 seconds. Dont burn the models scalp!
I worked my way down the lenght of hair and repeated in sections until it was all crimped. Wait to cool off!

Now to frizz!
Use the paddle brush and brush through all of the hair that has been crimped.

To add more to the frizz you can backcomb.
Take sections of hair roughly 3 by 2. Hold the hair by the ends and use a pintail comb to gently push the hair towards the root.
Repeat this with all of the hair!